
Beech's Hair Tutorial
+11
Alexa123
mrsphom
MelleashaSims
LittleSmirk
Shay
Bliss
Puggy
Alverna
j i l l i e<3
Cutebina
Beech
15 posters
Page 2 of 2 •  1, 2
1, 2
 BeechModerator
- Posts : 14656
Tokens : 19959
Join date : 2011-05-18
 Beech's Hair Tutorial
Mon Aug 29, 2011 9:39 pm
First topic message reminder :
Hi and welcome to my hair tutorial!
I am no expert when it comes to hair drawing, but I have mastered a technique that I like and that I think has a pretty good outcome. I am not a tablet user, so I have had to devise a way to do this with my mouse.
I use Photoshop Cs5 for my editing program, sorry for you GIMP users, not sure how this would translate over to that program!
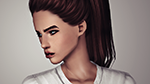
Anyway, Here is the finished photo:
[You must be registered and logged in to see this image.]
Not the best, I know, but I like it
So, how did I get that effect? I'll show you!
Step 1
Open your model and put her on a transparent background. I am not including steps on how to get the background removed, you should see other tuts for that like Rexy's or someone else's.
[You must be registered and logged in to see this image.]
Step 2
Choose the color hair you're going to use for your model. This model is a red head naturally, so chose to go with 4 reddish colors: a very dark brownish red for the base, a burnt red for the actual redness, a bright red for the popping highligts, and a pinkish-red for the highlights.
[You must be registered and logged in to see this image.]
I like to create a separate layer and name it "Palette" so I know to delete it later. I then take my paint brush and just create a palette with the colors I chose.
[You must be registered and logged in to see this image.]
Step 3
Begin with the base! Use your eye dropper tool and select the darkest color in your palette.
[You must be registered and logged in to see this image.]
Select your PEN tool - DON'T FORGET TO CREATE A NEW LAYER ON TOP OF YOUR MODEL.
[You must be registered and logged in to see this image.]
I know that the PEN tool can be difficult if it hasn't been used before. But it's really quite easy once you get the hang of it. First thing, click on your model where you'd like to begin and you'd see a node appear. Then click down further and hold the mouse button to drag and make it have a slight arch.
[You must be registered and logged in to see this image.]
Then alt+click the 2nd node you made to remove the extra line thingy (this will keep your line from doing a weird loopy thing).
[You must be registered and logged in to see this image.]
Once you've made it all the way back to your starting node you will see that it's created the shape you drew. Right click and select "Make Selection" - press okay when the next pop up menu appears.
[You must be registered and logged in to see this image.]
Click on your PAINT BUCKET tool and fill the selection you just created.
[You must be registered and logged in to see this image.]
It should look like this:
[You must be registered and logged in to see this image.]
Keep using the pen tool to create shapes for the basic hair shape - CREATE A NEW LAYER FOR EVERY NEW SHAPE
[You must be registered and logged in to see this image.]
When you are done with the basic shape, you should have something like this:
[You must be registered and logged in to see this image.]
Step 4
Adding the first layer of highlights. You will need to download the brush that Jillie provides in her hair tutorial for the right effect. Once you've downloaded it, you'll need to load the brushes into photoshop and it will look like this. I don't do anything to the brush except lessen the pixels. I never use the 12px - it's too big, so I suggest using something smaller. I chose 7px. Then use the eye dropper tool and select the next lighter color.
[You must be registered and logged in to see this image.]
Use the PEN tool again and click once near the roots and then follow the shape of your base hair shape. This should end up being one arched line.
[You must be registered and logged in to see this image.]
Right click and select "Stroke Path"
[You must be registered and logged in to see this image.]
In the next pop up window, select "Brush" from the drop down menu and make sure the "Simulate Pressure" option is checked. If you made your brush to the specifications I mentioned you should have a good line.
[You must be registered and logged in to see this image.]
Do that repeatedly following the shape and flow of the hair and you will eventually get something like this:
[You must be registered and logged in to see this image.]
For the brighter red and the pinkish-red highlights, change your brush size to 3px. Then follow the same steps creating the highlights.
[You must be registered and logged in to see this image.]
And here we go
[You must be registered and logged in to see this image.]
After a little shading and a new background, you will have something like this:
[You must be registered and logged in to see this image.]
I am not the best at writing tutorials so I apologize if something is vague. Just ask and I'll hopefully be able to answer you. Enjoy :pink heart:
Here's another that I did with this tutorial:
[You must be registered and logged in to see this image.]
Annnnd my latest:
[You must be registered and logged in to see this image.]
I am no expert when it comes to hair drawing, but I have mastered a technique that I like and that I think has a pretty good outcome. I am not a tablet user, so I have had to devise a way to do this with my mouse.
I use Photoshop Cs5 for my editing program, sorry for you GIMP users, not sure how this would translate over to that program!
Anyway, Here is the finished photo:
[You must be registered and logged in to see this image.]
Not the best, I know, but I like it
So, how did I get that effect? I'll show you!
Step 1
Open your model and put her on a transparent background. I am not including steps on how to get the background removed, you should see other tuts for that like Rexy's or someone else's.
[You must be registered and logged in to see this image.]
Step 2
Choose the color hair you're going to use for your model. This model is a red head naturally, so chose to go with 4 reddish colors: a very dark brownish red for the base, a burnt red for the actual redness, a bright red for the popping highligts, and a pinkish-red for the highlights.
[You must be registered and logged in to see this image.]
I like to create a separate layer and name it "Palette" so I know to delete it later. I then take my paint brush and just create a palette with the colors I chose.
[You must be registered and logged in to see this image.]
Step 3
Begin with the base! Use your eye dropper tool and select the darkest color in your palette.
[You must be registered and logged in to see this image.]
Select your PEN tool - DON'T FORGET TO CREATE A NEW LAYER ON TOP OF YOUR MODEL.
[You must be registered and logged in to see this image.]
I know that the PEN tool can be difficult if it hasn't been used before. But it's really quite easy once you get the hang of it. First thing, click on your model where you'd like to begin and you'd see a node appear. Then click down further and hold the mouse button to drag and make it have a slight arch.
[You must be registered and logged in to see this image.]
Then alt+click the 2nd node you made to remove the extra line thingy (this will keep your line from doing a weird loopy thing).
[You must be registered and logged in to see this image.]
Once you've made it all the way back to your starting node you will see that it's created the shape you drew. Right click and select "Make Selection" - press okay when the next pop up menu appears.
[You must be registered and logged in to see this image.]
Click on your PAINT BUCKET tool and fill the selection you just created.
[You must be registered and logged in to see this image.]
It should look like this:
[You must be registered and logged in to see this image.]
Keep using the pen tool to create shapes for the basic hair shape - CREATE A NEW LAYER FOR EVERY NEW SHAPE
[You must be registered and logged in to see this image.]
When you are done with the basic shape, you should have something like this:
[You must be registered and logged in to see this image.]
Step 4
Adding the first layer of highlights. You will need to download the brush that Jillie provides in her hair tutorial for the right effect. Once you've downloaded it, you'll need to load the brushes into photoshop and it will look like this. I don't do anything to the brush except lessen the pixels. I never use the 12px - it's too big, so I suggest using something smaller. I chose 7px. Then use the eye dropper tool and select the next lighter color.
[You must be registered and logged in to see this image.]
Use the PEN tool again and click once near the roots and then follow the shape of your base hair shape. This should end up being one arched line.
[You must be registered and logged in to see this image.]
Right click and select "Stroke Path"
[You must be registered and logged in to see this image.]
In the next pop up window, select "Brush" from the drop down menu and make sure the "Simulate Pressure" option is checked. If you made your brush to the specifications I mentioned you should have a good line.
[You must be registered and logged in to see this image.]
Do that repeatedly following the shape and flow of the hair and you will eventually get something like this:
[You must be registered and logged in to see this image.]
For the brighter red and the pinkish-red highlights, change your brush size to 3px. Then follow the same steps creating the highlights.
[You must be registered and logged in to see this image.]
And here we go
[You must be registered and logged in to see this image.]
After a little shading and a new background, you will have something like this:
[You must be registered and logged in to see this image.]
I am not the best at writing tutorials so I apologize if something is vague. Just ask and I'll hopefully be able to answer you. Enjoy :pink heart:
Here's another that I did with this tutorial:
[You must be registered and logged in to see this image.]
Annnnd my latest:
[You must be registered and logged in to see this image.]
 LittleSmirkMember
- Posts : 1239
Tokens : 6101
Join date : 2011-06-08 
Re: Beech's Hair Tutorial
Sun Sep 25, 2011 5:23 pm
Okay Sooo I still can't figure out how to get the small and separate stands, but this is my first shot from using a combo of your tut and jillie's tut : )
[You must be registered and logged in to see this image.]
Maybe I should have made it a bit bigger XD
[You must be registered and logged in to see this image.]
Maybe I should have made it a bit bigger XD
- BeechModerator
- Posts : 14656
Tokens : 19959
Join date : 2011-05-18
Re: Beech's Hair Tutorial
Mon Sep 26, 2011 12:51 pm
Not bad Smirk - but to answer your question, in order to get the smaller strands, you have to adjust the brush size to a smaller size before clicking the "Stroke Path" option
- LittleSmirkMember
- Posts : 1239
Tokens : 6101
Join date : 2011-06-08
Re: Beech's Hair Tutorial
Mon Sep 26, 2011 4:32 pm
Thanks ^_^ I'll give that a shot!
 mrsphomMember
- Posts : 83
Tokens : 4669
Join date : 2011-10-14
Re: Beech's Hair Tutorial
Fri Oct 14, 2011 3:43 pm
I have no idea where to find the pen tool. I have Photoshop elements 6.0. any ideas?
- mrsphomMember
- Posts : 83
Tokens : 4669
Join date : 2011-10-14
Re: Beech's Hair Tutorial
Fri Oct 14, 2011 4:23 pm
nevermind, googled it. elements 6.0 doesnt have the pen tool :saddie:
- BeechModerator
- Posts : 14656
Tokens : 19959
Join date : 2011-05-18
Re: Beech's Hair Tutorial
Fri Oct 14, 2011 5:01 pm
Oh, I'm sorry! I have CS5
 Alexa123Member
- Posts : 17
Tokens : 4626
Join date : 2011-09-08
Re: Beech's Hair Tutorial
Sun Nov 06, 2011 5:44 am
I can't understand the third step, whenever I click make selection and click the paint bucket the whole thing gets colored except the part I drew.
- BeechModerator
- Posts : 14656
Tokens : 19959
Join date : 2011-05-18
Re: Beech's Hair Tutorial
Sun Nov 06, 2011 4:22 pm
That sounds like for whatever reason the selection is choosing "Inverse" and so if you go to the SELECT tab at the top AFTER you make your selection, then click "Inverse" it will select the right portion and then you should be able to use the paint bucket to fill your selection!
 PuggyMember
- Posts : 1077
Tokens : 6059
Join date : 2011-07-06
Re: Beech's Hair Tutorial
Sat Nov 12, 2011 5:19 pm
Bump!
 film_simsMember
- Posts : 169
Tokens : 4552
Join date : 2012-05-09
Re: Beech's Hair Tutorial
Tue Jul 17, 2012 10:01 am
wow ! i will try it . thank beech ;)
- BeechModerator
- Posts : 14656
Tokens : 19959
Join date : 2011-05-18
Re: Beech's Hair Tutorial
Tue Jul 17, 2012 1:37 pm
NP alexandra.stanMember
- Posts : 2
Tokens : 4277
Join date : 2012-08-07
Re: Beech's Hair Tutorial
Thu Sep 13, 2012 5:53 am
This is stunning and you are an expert for sure, I enjoyed the tutorial going to try it again. :D
- BeechModerator
- Posts : 14656
Tokens : 19959
Join date : 2011-05-18
Re: Beech's Hair Tutorial
Fri Sep 14, 2012 2:02 pm
Thanks
- film_simsMember
- Posts : 169
Tokens : 4552
Join date : 2012-05-09
Re: Beech's Hair Tutorial
Fri Oct 05, 2012 6:36 am
Um.. Beech what brush did you use ?? i like that
- BeechModerator
- Posts : 14656
Tokens : 19959
Join date : 2011-05-18
Re: Beech's Hair Tutorial
Fri Oct 05, 2012 2:35 pm
It's a brush that Jilliee created. You can find it HERE
 pepsi_girlMember
- Posts : 19
Tokens : 4031
Join date : 2013-04-27
Re: Beech's Hair Tutorial
Thu Aug 01, 2013 7:40 am
Looks great!
 Serafina CampbellMember
- Posts : 2
Tokens : 3866
Join date : 2013-09-20
Re: Beech's Hair Tutorial
Fri Sep 20, 2013 5:04 pm
Thank you, this is awesome. <3 ^_^ n_n :D
Permissions in this forum:
You cannot reply to topics in this forum


